
Arugula Plant Care
Arugula is a green leafy plant with a distinctively peppery taste that has gained popularity in recent years. Known by its scientific name Eruca sativa, it belongs to the Brassicaceae family, which includes other well-known vegetables such as broccoli, kale, and cabbage.
This plant originates from the Mediterranean region and has been cultivated for centuries. Its leaves are commonly used in salads or as a garnish for many popular dishes.
Definition of Arugula Plant
Arugula is a fast-growing annual plant that can reach up to 3 feet tall with deeply lobed leaves that resemble dandelion leaves. It has small white flowers that appear in clusters during late spring or early summer and can self-sow easily if not harvested on time. Arugula plants prefer cooler temperatures ranging from 45-65°F (7-18°C) and require plenty of sunshine to thrive.
Importance of Arugula Plant in Cuisine and Health Benefits
Arugula’s popularity is due to its unique flavor profile, which provides a bold peppery taste that adds depth to any dish. The leaves have an intense aroma similar to mustard greens which makes them versatile ingredients for many recipes such as salads, sandwiches, pizzas, or pastas. Aside from being delicious, arugula also offers numerous health benefits.
It is low in calories but rich in vitamins A, C, and K which promote healthy skin and eyesight while boosting the immune system against illness. It also contains iron which helps transport oxygen throughout the body while folate helps prevent birth defects during pregnancy.
Purpose of the Article
This article aims to provide readers with comprehensive information about arugula plant care including cultivation techniques and common pest issues encountered by growers. By following our guidelines on growing arugula plants successfully, you can produce a healthy, bountiful crop with ease. Whether you’re an aspiring home gardener or a professional farmer seeking to improve your green thumb skills, this article has something for everyone!
Arugula Plant Overview
Description of Arugula Plant
Arugula, also known as rocket or roquette, is a leafy green vegetable that belongs to the Brassicaceae family. It has a distinct peppery taste with nutty undertones and is commonly used in salads, sandwiches, pizzas, and pasta dishes.
The plant can grow up to 2 feet tall and has elongated leaves that resemble dandelion greens. The leaves are dark green in color and have a lobed shape with sharp-toothed edges.
Types of Arugula Plants
There are several types of arugula plants available for cultivation, each with its own unique flavor profile and appearance. The most common types are wild arugula (Diplotaxis tenuifolia) and garden arugula (Eruca sativa).
Wild arugula has a more pungent flavor than garden arugula, while garden arugula tends to have larger leaves. In addition to these two varieties, there are also specialty varieties such as ‘Astro’, which has an upright growth habit and a milder flavor than wild arugula.
Growing Season and Climate Requirements
Arugula is a cool-season crop that prefers mild temperatures between 45-65°F (7-18°C). It grows best in well-draining soil that is rich in organic matter with a pH range of 6.0-7.0. Arugula can be grown in both full sun or partial shade but prefers at least 4 hours of direct sunlight per day.
In warmer climates, it’s best to grow the plant during the cooler months of fall or winter when temperatures are below 75°F (24°C). In areas with mild winters, it’s possible to grow arugula year-round by providing shade during the hotter months of summer.
Soil Preparation and Planting
Soil type and pH requirements
Arugula plants thrive in well-drained soil that has good moisture retention. Ideally, the soil should be slightly acidic with a pH of around 6.0 to 6.5 for optimal growth and yield. The soil should also be rich in organic matter, such as compost or well-rotted manure, to provide necessary nutrients to the plants.
Before planting arugula seeds, it is important to test the soil’s pH level to ensure that it falls within the ideal range for arugula. If it is too acidic or alkaline, you can adjust it by adding amendments such as lime or sulfur to reach the desired pH level.
Soil preparation techniques
To prepare the soil for planting arugula seeds, start by removing any rocks or debris from the surface and tilling the top 8-10 inches of soil. Mix in organic matter such as compost and aged manure into the soil using a garden fork or tiller. This will not only improve nutrient content but also ensure good drainage.
Once you have incorporated organic matter into your garden bed, rake it smooth and level before planting your arugula seeds. If your garden bed has poor drainage issues, consider creating raised beds that will allow excess water to drain away quickly.
Seed planting instructions
Arugula seeds are relatively easy to grow and require little maintenance once established. Seeds should be planted about 1/4 inch deep in rows spaced about 12 inches apart. Once planted, gently cover with soil or vermiculite.
It is essential not to plant seeds too deeply since they require light for germination; otherwise, they will fail to sprout correctly. Water consistently after planting until seedlings appear above ground (usually within 7-10 days).
Once seedlings reach 2-3 inches tall, thin them to a spacing of 3-4 inches apart. This will help ensure that each plant has adequate space to grow and develop into healthy arugula plants.
Watering and Fertilization
Watering frequency and amount
Arugula plants require regular watering to grow healthy and produce the best yield. The frequency and amount of watering depend on several factors, including climate, soil type, and plant age. In general, newly planted arugula seeds require more frequent watering than mature plants.
To ensure proper hydration for your arugula plants, check the soil moisture level regularly. If the top inch of soil feels dry to the touch, it’s time to water again.
Depending on your location and climate conditions, arugula may need to be watered every day or every other day. When watering, aim for a deep soaking that saturates the soil to a depth of at least 6 inches.
Fertilizer types and application methods
Arugula is a relatively low-maintenance plant that doesn’t require excessive fertilization. However, providing adequate nutrition can help promote healthy growth and improve the flavor of leaves.
When selecting a fertilizer for arugula plants, look for options that are high in nitrogen as this element is essential for leafy growth. Organic fertilizers such as compost or well-rotted manure can provide slow-release nutrients over time without harming beneficial microorganisms in the soil.
Fertilizers should be applied at least once during the growing season when plants begin putting out new leaves or after thinning seedlings if necessary. Avoid over-fertilizing which can lead to stunted growth or even death of your arugula plants.
Common issues with over-watering or under-fertilization
Over-watering is one of the most common mistakes made when caring for arugula plants. This can cause root rot leading to stunted growth or even death of your plant. On the other hand, under-fertilization leads to poor-quality leaves and reduced yield.
To prevent over-watering, make sure to adjust the watering frequency according to the moisture level of the soil. Over-fertilization can also lead to leaf damage or browning.
Use only the recommended amount of fertilizer to avoid this issue. If you notice any signs of nutrient deficiency, such as yellowing leaves or stunted growth, consider fertilizing your arugula plants with a balanced fertilizer that contains equal amounts of nitrogen, phosphorus, and potassium.
Pest Control Measures
Common pests affecting arugula plants
Arugula plants are susceptible to a variety of pests, including aphids, flea beetles, and cutworms. These pests can cause significant damage to the plant by feeding on the leaves and stems and can even kill the plant if left untreated. Aphids are small, soft-bodied insects that suck sap from the plant, leaving behind a sticky residue known as honeydew.
Flea beetles are small black or brown beetles that jump like fleas when disturbed and feed on the leaves of the arugula plant. Cutworms are caterpillars that feed on the stem of young plants at night, causing them to wilt or die.
Preventive measures to control pest infestation
Prevention is key when it comes to controlling pest infestations in arugula plants. One effective method is crop rotation. By rotating crops each year, you can help prevent pests from becoming established in your garden soil.
Additionally, planting companion crops such as marigolds or garlic can help repel some common arugula pests. Other preventive measures include maintaining good garden hygiene by removing weeds and debris that can harbor pests and regularly inspecting your plants for signs of infestation so you can take early action if necessary.
Organic pest control options
If you have an infestation of arugula pests despite preventative measures, there are several organic options for controlling them without resorting to harsh chemicals. One option is releasing beneficial insects such as ladybugs or lacewings into your garden to prey on aphids or other small insects.
Another option is using natural pesticides such as neem oil or diatomaceous earth. Neem oil works by disrupting insect growth hormones while diatomaceous earth kills insects by abrading their exoskeletons with sharp microscopic particles.
Handpicking and removing pests from your plants can be an effective way to control an infestation, particularly for larger insects like cutworms. While it can be time-consuming, it is a safe and natural option that won’t harm your plants or the environment.
Harvesting Techniques
Timeframe for Harvesting Arugula Leaves
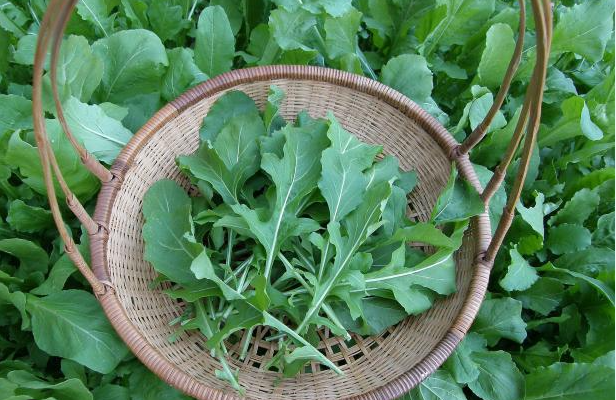
Arugula leaves are best harvested when they are young and tender, with a mild peppery flavor. The best time to harvest arugula plants is typically between 20-40 days after planting, depending on the variety and growing conditions.
Arugula can be picked continuously over several weeks, with new leaves forming from the center of the plant as older leaves are removed. If left too long, arugula leaves become tough and bitter.
Harvesting Techniques for Optimal Yield
To maximize yield, harvesting should be done early in the morning or late in the day when temperatures are cooler and plants are less stressed. When harvesting arugula leaves, use sharp scissors or a knife to cut off individual leaves at the base of the stem, being careful not to damage nearby foliage or stems. This encourages new growth and prolongs the harvest period.
For larger harvests, entire plants can be harvested by cutting them off at just above soil level with a sharp knife or scissors. This method is best for mature plants that have grown tall and woody stems that are beginning to flower.
Post-Harvest Care Tips to Extend Shelf Life
After harvest, the arugula should be immediately rinsed in cold water and dried thoroughly before storing it in a plastic bag or container lined with paper towels. Store arugula in the refrigerator’s crisper drawer for up to five days.
To further extend shelf life wrap fresh arugula tightly in a damp paper towel before refrigerating. If you have more arugula than you can use within five days consider preserving it by freezing it as most herbs do not dry well due to their high water content – blanch washed whole leaves for 30 seconds then transfer them into ice water for 2-3 minutes to stop the cooking process.
Drain and pat dry with paper towels then freeze in an airtight container or freezer-safe bag. Frozen arugula can be added to soups, stews, and sauces for a burst of peppery flavor throughout the year.
Storage Options for Arugula Leaves
Short-term Storage Options for Fresh Leaves
Once you have harvested your arugula, you’ll want to store it properly to ensure freshness and flavor. For short-term storage, the best method is to wrap the leaves in a damp paper towel and place them in a plastic bag or sealed container.
This will help prevent the leaves from drying out and becoming wilted. You can also add a few drops of water to the bag or container for extra moisture.
It’s important not to wash the arugula leaves before storing them, as excess moisture can cause them to spoil more quickly. Instead, wait until just before using them to give them a quick rinse under cold water and pat them dry with a clean towel or paper towel.
Long-term Storage Options for Preserving Leaves
If you have an abundance of arugula that you won’t be able to use up within a few days, there are several long-term storage options available. One of the most popular methods is freezing. To do this, blanch the arugula leaves in boiling water for 30 seconds, then immediately transfer them to an ice bath to stop the cooking process.
Once they’ve cooled down, drain off any excess water and pack the leaves into freezer bags or containers. Another option is dehydrating the arugula leaves.
This involves spreading out washed and dried leaves on a baking sheet and placing it in an oven set at its lowest temperature (around 150°F) until completely dry (around 4-6 hours). You can then store these dried leaves in an air-tight container or plastic bag.
No matter which method you choose, be sure to label your stored arugula with the date so that you know when it was harvested or preserved. While these long-term storage options are great for extending the shelf life of your arugula, keep in mind that the flavor and texture may not be as fresh as when first harvested.
Conclusion: Summary of key points on Arugula Plant Care
Arugula Plant Care and Maintenance
Arugula is an easy-to-grow crop that thrives best in cool weather with adequate watering. To cultivate a good harvest, it is important to choose the right location, soil, and method of planting.
It is also essential to maintain proper watering techniques and fertilization practices throughout the growing season. Arugula plant care entails proper pest management to ensure the arugula leaves are free from pests such as aphids, flea beetles, and slugs that can damage the crop’s yield.
Harvesting Techniques for Optimal Yield
Arugula leaves can be harvested at any stage of growth starting from the seedling stage to the maturity stage. Harvesting should be done regularly to maintain tenderness and avoid bolting.
The ideal time for harvesting is when the plants have reached a height of 5-6 inches tall or 4-5 weeks after planting. For leafy greens such as arugula, it is better to harvest early in the morning when temperatures are cooler and plants are well-hydrated.
Storage Options for Arugula Leaves
After harvesting arugula leaves properly, it’s important to store them properly too if they won’t be used immediately. Short-term storage options include storing them in a cool place wrapped in a damp cloth or in an airtight container under refrigeration for up to two weeks; long-term storage options include freezing or dehydrating arugula leaves. Growing your own arugula plant can provide numerous benefits such as cost savings, freshness and quality control over store-bought produce.
Properly caring for this versatile crop includes soil preparation techniques like pH requirements and seed planting instructions; watering requirements by frequency and amount; pest control measures; harvesting techniques to optimize yield, and storage options for arugula leaves. With the right care and attention, you can cultivate a fruitful arugula plant garden that meets your culinary and nutritional needs.